One of my first projects using Arduino happened during the Christmas season, so seemed a good idea to create Christmas lights to illuminate and brighten the house.
The first step is to gather the necessary hardware:
- 1 x Arduino, I used the Arduino 2009;
- 2 x breadboard, should be enough to perform the tests;
- 1 x switch button, it will be used to switch between the diferrent lightning effects;
- 8 x red LEDs
- 8 x green LEDs
- 8 x yellow LEDs
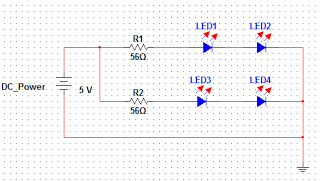
- 4 x 56Ω resistor
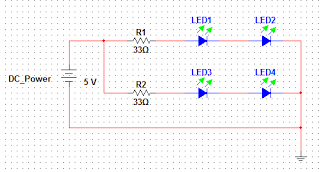
- 4 x 33Ω resistor
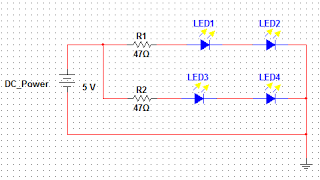
- 4 x 47Ω resistor
- 1 x 10kΩ resistor
- wiring
The second step is to connect LEDs so that there are no excessive current circulating in the circuit since a small change in voltage may cause large current variations (the current through an LED varies exponentially according to the voltage that crosses).
The solution is to use resistors, which have the purpose of limiting the amount of current to a safe value. To define the resistors values and the appropriate way to connect the LEDs I resorted to the following website: LED center.
Relevant information:
- DC source voltage: 5V (Arduino output)
- Forward voltage:
- Red LED: 2.0V
- Yellow LED: 2.1V
- Green LED: 2.2V
- Forward current: 20mA for 3mm and 5 mm LEDs
- Number of LEDs: 4 x LEDs for each Arduino output (it were used 6 outputs)
The represent the whole circuit I used Fritzing. This tool, which is an open-source project, allows documenting prototypes, share those same prototypes and even design the layout of a printed circuit board (PCB).
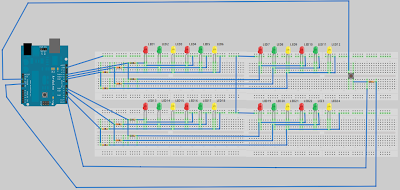
To download the Fritzing file (.fz extension) click here.And so it concludes the part referring to the hardware.
The third step is the lighting effects program creation for Arduino. The program was written using the Arduino IDE and is defined by a set of lighting effects and the ability of switch between them. The following lighting effects were defined:
- blinkAllLights: the lights turn on and off periodically;
- runningLights 0: the lights starts as off and then light up and down successively;
- fadingLights: the LEDs intensity is increased and decreased step by step;
- runningLights 255: the lights starts as on and then light down and up successively;
- Adds the above affects,1 to 4, in a sequential manner within a loop.
The switch button lets you toggle between the different lighting effects. It should be mentioned that the fading effect implies using the PWM Arduino outputs.
The code can be downloaded from this link.

Merry Christmas and Happy New Year!